Sunday, January 15, 2006
Preparation for Practice
Themes of an Effective Baseball Practice
As the baseball season creeps closer and closer, it is time to evaluate the practice plan for the 2006 season. An effective practice plan is the cornerstone of a successful program. When devising a plan, coaches must consider the players that will be participating in practice. Often, when a coach has a young team, they are forced to focus on individual skills and techniques. Many players are learning these fundamentals for the first time, so the skill must be enforced on a daily basis. If a team is more experienced, focusing on individual skills may cause some players to lose interest in the skill the coach is trying to reinforce. When a coach has an older group, they must look for ways to challenge each player to perform an individual skill within a team drill. These drills must continually get harder so execution is hard to obtain. Also, when a coach has a seasoned group of players they can look to improve an individual skill by incorporating resistance training to the movement. Using resistance during the exercise gives the players an added challenge during the movement plus psychologically keeping them focused on the individual skill.
This year, our team returns many from last year’s squad. Previously last summer, the team has spent countless hours fielding groundballs, catching flyballs, and taking batting practice. These procedures produced good results, but now need to be altered to help the team progress. That is why, this year, our practice focus will spotlight taking individual skills and executing them in a team offensive and defensive drill setting. Below, I have listed our practice breakdowns using our 120 minutes allotted by the school for gym usage during preseason practice:
120 Minute Pre-Season Practice Session
Arm Strength and Accuracy 10%
12 Minutes
Individual Defensive Skills 10%
12 Minutes
Baserunning and Stealing 20%
24 Minutes
Team Defensive Skills 20%
24 Minutes
Individual Offensive Skills 20%
24 Minutes
Team Offensive Skills 10%
12 Minutes
Speed and Strength Training 10%
12 Minutes
Total 100% 120 Minutes
Arm Strength and Accuracy 10% 12 Minutes
Wrist Flicks
Two Knee Drills
Pull Down
Long Toss
Quick Throws
Weighted Balls
Individual Defensive Skills 10% 12 Minutes
Two Knee Glove Work (Forehands)
Partner V-Cut
Two Knee Glove Work (Backhands)
Standing Glove Work (Forehands)
Two Knee Glove Work (Short hops)
Standing Glove Work (Backhands)
Standing Glove Work (Slow rollers)
Standing Glove Work (Short hops)
Standing Glove Work (Tags)
Standing Glove Work (Transfer)
Throwing (Square Drill)
Throwing (Square Drill with tags)
Baserunning and Stealing 20% 24 Minutes
Lead Off Starts
Double Play Break Ups
Pitcher Reads/Starts
Tag ups
1st to 3rd
Squeeze Plays
2nd to Home
Slides
Delayed Steals
Run Downs
Team Defensive Skills 20% 24 Minutes
Double Play Drill
Control Running Game Drill
One-Half Field Drills
Bunt Drill
Hit/Run Drill
Double Cut Drill
Individual Offensive Skills 20% 24 Minutes
Batting Practice
Soft Toss
Batting Tee
Short Toss
Lead Arm Hitting
Top Hand Hitting
Over Weight Training
Under Weight Training
Team Offensive Skills 10% 12 Minutes
Lead Arm Infield
Hit/Run Drill
RBI Baseball
Breaking Ball Scrimmage
Two Strike Scrimmage
Soft Toss Gap Scrimmage
Speed and Strength Training 10% 12 Minutes
Parachute Running
Uphill/Stair Running
Jump Rope
Plyometric Drills
Weight Room Workout
Distance Running
Pitching is another element of practice that must be addressed everyday. If it is not, your baseball team has absolutely no chance to be successful. We have a totally separate practice for pitching that usually runs about 40-45 minutes. Below, I have listed the themes that these practices address:
45 Minute Pre-Season Pitching Practice
Throwing 50% 22 Minutes
Strength 15% 7 Minutes
Conditioning 35% 16 Minutes
Total 100% 45 Minutes
Throwing 50% 22 Minutes
Bullpens
Two Knee Drills
Shot Put Drill
Arm Swing
Leg Coupling Drill
Glove Elbow Throw Drill
Strength 15% 7 Minutes
Stretch Cord Workout
Dumbbell Workout
Shot Put Lifts
Push Ups
Medicine Ball
Ankle Weights
Conditioning 35% 16 Minutes
Sprints
Distance Running
Lunge Workout
Jump Rope
Abdominal Workout
Plyometric Workout
Tuesday, January 10, 2006
The Final Stage


Linear Hitting III: “The Fire”
If the “Stretch” stage is the hardest to teach, then the “Fire” stage is the easiest. Since the hitter’s hands stay back in the “Stretch” position, their lead arm should be almost fully extended. The “Fire” stage begins when the hitter’s front leg, which should carry the hitter’s weight, becomes extended. The hitter should aggressively push down on the lead leg and snap it closed. The snapping of the lead leg generates weight transfer through the baseball.
While this movement occurs, the hitter’s back leg, which is weightless, is picked up off the ground. Many times, a hitter’s back foot may be completely lifted off the ground. Frank Thomas, a linear hitter, is a prime example. He generates so much straight-line force that upon rotation his back foot is jerked off the ground. Most hitters complete their swing in what is know as a “Kick Stand” finish. Translated, this simply means that hitters have only their back toe in contact with the ground. If a hitter finishes in this position, it is assured that they have used all their available weight.
With the lead leg extending first, the hitter’s hands are the last body part to fire. As the lead leg straightens, the other body parts turn towards the ball. The hitter should maintain lead arm extension and focus on their hands not drifting during the extension of the lead leg. When the lead arm fires toward the ball, the hitter’s hands should stay relaxed and follow. With a bat that lags around the head area, the hitter should generate excellent bat speed. Dr. Yeager really pounds this point home about lead arm extension and it is very insightful. He states the further back a hitter’s hands start the more force they can apply to the bat while swinging. This is a fact cannot be disputed because it can be proven through measurement.
After contact with the baseball has been made, the hitter will release their top hand before wrist rollover. By releasing the top hand from the bat, the hitter’s bottom hand will continue on a straight-line path. Also, by practicing a top hand release, hitters are trying to create backspin on the pitched ball. By creating backspin, hitters gain distance and velocity due to the Magnus Force principle. If the hitter does not release the top hand, usually topspin is created. Thus, the ball is slow and its distance reduced. Furthermore, hitters must try and finish as high as possible with their hands. When this occurs, it certainly illustrates the hitter gaining maximum extension.
Above, I have posted two hitters finishing the “Fire” phase of the swing. If you break it down to the simplest form, the oral cue would be to “Snap and Fire”. This tells the hitter to snap the lead leg and fire the hands. Each of the pictures, displayed above, illustrates these cues. Each hitter extends the front leg, gains lead arm extension, and practices a top-hand release. All of these hitters, practicing good linear mechanics, use momentum to create a smooth, flowing swing that produces amazing results.
Monday, January 09, 2006
What is Important in the Arm?

The Catapult: Getting the Shoulder to the Correct Position
I have read a lot recently about the mechanics on Mark Prior, the great young pitcher for the Chicago Cubs. I have even seen some photos of his external rotation of the elbow. In the picture, Prior’s elbow position is unbelievable. As his body goes forward, the elbow and forearm bend at a remarkable angle. It is as if his forearm is being broken in half.
Upon looking at the picture, I decided to exam his delivery further looking to see if Prior makes a complete rotation with the humerus bone inside the shoulder socket. I am looking for that specific movement because I hypothesize that successful pitchers like Roger Clemens, Nolan Ryan, and Greg Maddox, who have pitched into their forties and not lost velocity, all made complete rotations with the upper arm.
What is the humerus bone and how does it help the shoulder? The humerus bone is located in the upper arm. The bone attaches in the shoulder socket and at the elbow. At the two connecting points, the humerus bone is attached to several very important ligaments. First, at the shoulder socket, the humerus bone connects to the rotator cuff. This ligament holds the shoulder in place and allows the arm to be lifted. At the other end, the humerus bone connects to the ulna collateral ligament in the elbow. This ligament holds the elbow and forearm together. Both of these ligaments are commonly injured by pitchers from little league all the way to professional baseball. By injuring these ligaments, pitchers must undergo surgery to repair the damaged areas.
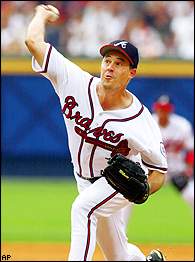
Why is a complete rotation of the humerus necessary to maintain a healthy arm? Since the humerus bone is attached to the rotator cuff and ulna collateral ligament, the bone must be put in motion properly to keep stress on these ligaments to a minimum. Applying momentum out of the pitcher’s hand break is a central component of reducing stress to the pitching arm. For instance, Greg Maddox, pictured above, illustrates exactly what I am talking about with regards to the humerus bone. As you can see, Maddox's upper arm has made a complete rotation from his hand break. His hand starts low out of the glove, with his throwing elbow making a small movement toward first base. As his body travels forward, the arm separates and lags behind. Quickly, Maddox rotates the shoulder, like a swimmer performing the crawl stroke, and puts it in a catapult-like position. At this point, his shoulder is externally rotated but the elbow flexion resembles a shot-putter. The evidence of this rotation can be identified in his upper arm/forearm relationship and release. Maddox’s humerus bone is elevated, above his shoulder. Getting his arm into this position required Maddox to use the low hand break and swing the arm backwards. By swinging the arm on the break, Maddox reduced rotator cuff stress. Using this momentum, Maddox maintains good elbow flexion and allows the arm to extend on the release. Using proper elbow extension, Maddox does not stretch and violently snap the ulna collateral ligament in his throwing elbow. He extends the arm and allows his hand to pronate naturally.
Looking at Prior’s delivery, it is a different story. His upper arm/forearm relationship is closer to 90 degrees. At this arm angle, he can generate maximum external rotation of his elbow. The snapping affect of the forearm generates velocity in his release, but places a significant amount of stress on the arm. If you compare pictures, glance at the humerus bone position during Maddox’s delivery and then compare it to Mark Prior. Maddox gets the upper arm high and uses leverage and momentum reducing stress and tension on the rotator cuff and ulna collateral nerve. Also, by maximizing extension, it seems Maddox releases the ball closer to home plate than Prior, even though Prior is significantly taller. I have found photos of Prior practicing a lower hand break and his forearm position appears less stressful when he practices these mechanics.
In has been my experience with pitchers that many young players throw just like Mark Prior. As a coach, I find this habit very hard to help a player break. Pitchers who practice a whip-like throw usually delivery from the ¾ arm slot and have a tendency to throw across their body. Since their arm path has been established and repeated, it is very difficult to break him from the habit.
If you want to view many informative breakdowns of effective pitching deliveries, check out: www.chrisoleary.com
Mr. O’Leary was assembled a variety of pictures that illustrate not only effective, but ineffective pitching motions. If you check out his site, I guarantee you will be amazed at the information he provides to parents and coaches. It seems Mr. O’Leary is dedicated to helping pitchers stay healthy and maximize their ability.
Linear Hitting: The Stretch

Linear Hitting Part II:
“The Stretch”
In the previous article, I described the first stage in our hitting philosophy called “The Load”. After the load of the back leg has been completed, the second stage in our hitting philosophy can be performed. As soon as the stride foot is placed down our hitters are in “The Stretch” stage of the swing. Dr. Chris Yeager does an excellent job of describing this stage in his DVD series.
Simply, when we explain this stage to our players, after foot plant as occurred the hitter’s weight should be forward and their hands should stay back. The hitter, going into the stride, must attack the ball. By incorporating an attack movement, the hitter must transfer their weight from the back to front on a bent front leg. If the front leg is extended, the hitter’s weight will not be forcefully transferred.
During the load, as the hitter’s weight transfers to the rear, their hands will naturally take a backward movement as well. This makes sense because the rest of their body is moving backward during “The Load” stage. To get into “The Stretch” stage of the swing, the hitter’s hands, which moved backwards, stay there as the hitter’s weight moves forward. Usually, the hitter’s hands are even with the rear foot. When this happens, the hitter’s lead arm becomes extended and the hitter can feel a stretch in their tricep.
The tricep is not the only muscle that receives a stretch. The groin is another muscle, which the hitter should feel stretched after the stride foot has landed. Since the hitter is attacking the ball in a straight line, their back leg may become extended after the stride as all the weight is transferred to their front side. With a flexed front side leg, the hitter’s rear foot may be partially off the ground. To fully understand, examine the above illustration. Notice, the hitter has transferred their weight forward, but left their hands back. The hands, which should be relaxed, are almost even with their back foot.
Relaxing the hands is important because it allows the bat barrel to follow the hands to the ball. Thus, with the relaxation, keeping the hitter in a straight line during the swing. This can be measured by the bat angle of the hitter in the “Stretch Position.” If the hitter uses loose muscles, the bat should slightly lag around the head area. If the hitter’s muscles tighten, the bat will be in a straight up/down positioning. When the bat is up/down, the hitter’s barrel usually tends to lead. If the barrel leads the swing, the hands create a circular path and all the straight-line principles are out the window.
In conclusion, we teach our hitters to relax, keeping their weight forward and hands back. In the last article of this series, I will discuss the swing’s final stage ‘The Fire” and how hitters can incorporate good extension through their swing.
Saturday, January 07, 2006
A Three Part Series: Load, Stretch, and Fire

Linear Hitting: Load, Stretch, and Fire
As the days pass toward the first day of practice in February, it is important to implement your program’s hitting philosophy for freshman to start incorporating. In the next three-part article, I will present our style of swinging the bat. Hopefully, this information can be useful as the season approaches.
My ideas were greatly influenced by Dr. Chris Yeager, formerly of the University of Southern Mississippi. Currently, Dr. Yeager is employed by the San Diego Padres as a member of their player development team. Dr. Yeager conducted several swing breakdowns of different minor league ballplayers. His hitting theory involves the use of momentum, lead arm extension, and a series of pushes by player’s lower body. If you are interested in learning more about his method, please visit his website at www.baseballscience.com. He has a DVD that is the best hitting instruction I have ever seen either by college or pro hitting instructors.
From Dr. Yeager I formulated my own version of his teachings to accommodate the 15-16 year old players compared to his professional athletes. The method uses three oral cues: load, stretch, and fire. The players love the easy language and the hitting style allows them to use their whole body during the swing. Below, I will describe the first stage in the hitting philosophy entitled,” The Load.”
At the top of the article, George Brett is loading the back leg. As you can see, his entire front foot comes off the ground and all of his weight is placed on the back leg. By just picking up the leg, Brett has transferred all his weight backwards. When a hitter gets total weight transfer on the back leg, they have only two places for the weight to go when the stride foot comes down. The hitter could simple put his foot back to its original position or the hitter could push their weight forward toward the pitch and attack by gaining ground from the stride foot’s original position. We teach our hitters to attack during the stride and this is an idea Dr. Yeager touches on during his hitting DVD. But, to understanding “The Load” phase of the swing, we teach our hitters to maintain balance and take their whole foot off the ground and transferring all their weight to the rear leg, just like in the illustration above. We think it is the easiest way to teach hitters to load their backside.
In the next section, I will discuss “The Stretch” phase of the swing and provide an illustration to help paint an accurate picture of what we are teaching our players to do during their swing.
Monday, January 02, 2006
A Good Read
Attention Coaches!!!!!!!!!!
Looking for a good book to read? Over the holidays, my wife purchased Coach by Michael Lewis. The book was rather short, but really packed a punch. Lewis, the author of Moneyball, writes about his former high school baseball coach. The book describes to conflicting situations. The first follows former players who are raising money to build a gym in his honor. The second follows his current players and their parents who are trying to get the coach fired. Every coach who has ever encountered overbearing parents MUST READ THIS ONE!
Looking for a good book to read? Over the holidays, my wife purchased Coach by Michael Lewis. The book was rather short, but really packed a punch. Lewis, the author of Moneyball, writes about his former high school baseball coach. The book describes to conflicting situations. The first follows former players who are raising money to build a gym in his honor. The second follows his current players and their parents who are trying to get the coach fired. Every coach who has ever encountered overbearing parents MUST READ THIS ONE!
Sunday, January 01, 2006
Getting the Stride Down
Solving the Question, “When Should I Stride?
The One, Two, or Three Count Hitting Method
Objective: To help hitters understand and apply proper timing mechanics to every at-bat.
Summary: As a coach, the stride is the grayest area of all when it comes to individual hitting. Teaching hitting, I was always frustrated when a pitcher with good, quick velocity was on the mound and our hitters struggled against their fastball. Often, I would remind hitters to stride early and “read” the pitch. Looking back on this advice, it is way too vague for a hitter to understand. That is why, over the off-season, I have formulated the count system for our hitters. The system, when applied, gives a hitter a concrete timing mechanism to incorporate during their at-bat. The following is a short description of the timing techniques:
One Count: The “One-Count” approach is usually incorporated with pitchers that do not have good stuff or a starting pitcher that has begun to get tired. The goal of the “One Count” approach is to get extra base hits, including homeruns. The pitcher, who does not have great velocity, generally tries to entice hitters to drag their hands through the zone. Usually, hitters, who are getting out, are hitting weak fly balls or groundballs. By using the “One Count” approach hitters are trying to use all of their straight-line momentum to drive the ball in the gaps or out of the park. To incorporate this system, hitters must load and stride before the release of the pitch. This should take place with a mental “One Count” in the hitter’s head. So to the hitter, there is only a one count from the stride completion to the actual swing.
Two Count: The “Two-Count” approach is usually incorporated with pitchers that have average velocity and breaking pitches. The goal of the “Two Count” approach is to hit balls in the gaps or solid line drives. The pitcher, who has average stuff, generally can keep players off balance with their breaking balls. Usually, hitters, who are getting out, are hitting weak fly balls the other way or slow groundballs to the off field. By using the “Two- Count” approach hitters are trying to use all of their straight-line momentum to drive through the ball. The “Two Count” approach allows the hitter more time to read the pitch. To incorporate this system, hitters must load and stride before the release of the pitch. This should take place with a mental “One, Two Count” in the hitter’s head. So to the hitter, there is only a two count from the stride completion to the actual swing.
Three Count: The “Three-Count” approach is usually incorporated with pitchers that have high velocity and good breaking pitches. The goal of the “Three Count” approach is to put the ball in play either on the ground or in the air. The pitcher, who has above average stuff, generally can keep players off balance with their breaking balls and throw their fastballs by the hitter. Usually, hitters, who are getting out, are either frozen on breaking pitches or swinging and missing fastballs. By using the “Three- Count” approach hitters are trying to use all of their straight-line momentum to drive through the ball. The “Three Count” approach allows the hitter more time to read the pitch. To incorporate this system, hitters must load and stride before the release of the pitch. This should take place with a mental “One, Two, Three Count” in the hitter’s head. So to the hitter, there is a three count from the stride completion to the actual swing.
On-Deck Routine: This is the most important element in training hitters in the counting system. The on-deck space allows the hitter to develop timing with the pitcher. The hitter should focus on the pitcher’s release and when to stride at the proper time. If the coach indicates that the pitcher is a “One Count” thrower, the on-deck circle is the place where hitters must get their stride timing down. If the hitter fails to use the on-deck circle appropriately, they will not be effective using this model.
Summary: This model places a lot of emphasis on simple physics. First, the “One Count” approach forces the hitter to generate the momentum during the swing. When the “One Count” model is being practiced, the pitcher generally does not have much velocity in their throw. The hitter must use their momentum to generate power in their swings. The “Two Count” or “Three Count” model allows the hitter to cut down their momentum and use the pitcher’s force on the ball to generate power. Also, by cutting down the force of the hitter, it allows them more time after the stride to read the pitch. As you can see, the objective of each model is clearly stated from hitting the ball in the gaps to just putting it in play. Another benefit of this model is the timing of breaking balls. Pitchers with good breaking balls should not be able to fool hitters that are practicing either the "Two Count" or "Three Count" approaches.
![]()