Tuesday, August 29, 2006

Pitching Stage Seven
Wall of Resistance
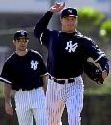
Actually, Dr. Tom House is credited for illustrating this stage with his National Pitching Association (NPA) research. The Wall of Resistance is an imaginary line drawn through the pitcher’s foot upon touch, after the leg kick. This straight line passes through the plant foot and extends to the sky. At foot plant, the pitcher’s head should be behind the line. During release, the pitcher’s head must pass through the line and ahead of the plant foot. If the pitcher is able to execute this action, proper directional force has been applied. Also, forced apply toward second base allows the pitcher to release his pitch closer to home plate. Furthermore, maintaining forward momentum with the lower body greatly reduces upper arm stress and chance of injury. If the pitcher is not able to generate an opposite lower body push, their arm will have to generate much of the force behind the ball. Pitchers that isolate their arm to produce force may experience problems with extreme arm soreness, injury, and fatigue. Above, left handed pitcher David Wells has just reached foot plant. His head is clearly behind his glove leg on foot strike. Like all Major League pitchers, Wells will explode through the “Wall of Resistance” during release. Wall of Resistance
One oral cue that our team uses for pitchers to create lead leg push is “Get some air under your heel.” This has helped our pitcher visualize transferring their weight forward and freeing their rear leg. Also, the oral cue “Finishing on your toe” has helped our pitchers visualize proper weight transfer during their delivery. As a coach, the best way to measure if players are breaking through the Wall of Resistance is that watch the pitcher’s back leg. If their leg achieves full extension through release, the pitcher has activated and used the appropriate force production mechanics. If not, coaches need to incorporate drills that promote lead leg push and opposite directional pushes.
Thursday, August 24, 2006
Stage IV

Pitching Stage Six: Elbow Flexion
As pressure is applied toward the hip by the glove arm, after maximum front side tilt, the humerous bone turns over and the forearm begins moving toward the plate. As the ball enters the straight-line path to the plate, the pitcher’s elbow needs to have less than 90-degree flexion. If a pitcher has more than 90 degree flexion, chances are, they are going to experience extreme soreness in their pitching elbow. The elbow, isolated due to decreased flexion, causes this soreness. If prematurely extended, the elbow receives no support from the bicep and forearm. With the violent forward force and weight from the ball, pitchers force their elbow to carry most of workload. Dr. Mike Marshall calls this practice “Reserve Forearm Bounce”. There are many pictures that illustrate this mechanical flaw. A pitcher, who has premature extension or “Reserve Forearm Bounce”, often at foot plant display a large lag in the forearm. The pitcher’s lagging forearm bounces, once the body continues forward to deliver the pitch. Since the elbow is such a small joint, it cannot tolerate the stress of being isolated and starts to distribute force to the delicate surrounding ligaments and tissue. At this step, pitchers are likely to be seriously injured.
By having proper flexion, like the illustrations above, pitchers are able to rely on the bicep and forearm to apply force to the ball. Also, the elbow is supported, as the pitcher delivers to the plate. Furthermore, by practicing good elbow flexion, pitchers can release the ball closer to home plate. Releasing closer to home plate creates a competitive advantage for the pitcher, increasing velocity and cutting the hitters reaction time to the pitch. Finally, practicing adequate elbow flexion will help pitchers throw a legitimate vertical breaking ball, instead of a horizontal spinning slider or slurve.
Wednesday, August 23, 2006
A New Off-Season
2006-2007 Baseball Blog Preview
The 2006 Summer American Legion Baseball Season is finally completed. Again, it is time to begin posting articles for this off-season. The following is a list of topics; I will cover throughout the winter:1. Post Soft Toss/Batting Average Correlation
2. Finish Pitching Phases
3. Mid-Season Medicine Ball Workout
4. Use of Wood Bats during the Season
5. Pitcher's Pickoff Circuit
6. Practice Warm Up with the Shot Put
7. Lead Arm Resistance Experiment
8. Explaining “Bat Lag”
9. Perfecting the Rundown
10. Catching Drills
![]()