Tuesday, December 27, 2005
Searching for Answers?
Updated Information on the Gyroball
The listings below are the things that I have found out so far about the Gyroball. I will continue my informational crusade about this pitch until I have learned how to throw it. If anyone, who visits this site, can add to the list, please contact me and I will submit additional information about this pitch.
Things I have learned about the Gyroball
1. The ball, when getting into position for release, should point at the pitcher’s ear. This position is similar to the quarterback throwing a football.
2. The Gyroball spins in a perfect, counter-clockwise motion.
3. The Gyroball looks exactly like a fastball, until sharply breaking right to left, when thrown by RHP.
4. The Gyroball is delivered using “Double Spin” mechanics, meaning the pitcher’s hips rotate forward followed by the elbow pronating along with the pitcher’s wrist and hand.
5. The pitcher must make sure their hips and shoulders are aligned at foot plant to throw the Gyroball perfectly.
Please contact this blog if you can add to the list.
How can the spin help?
Using Magnus Force Correctly
Over the many years, college physic departments have studied the effects of the thrown and pitched baseball. One specific study, by the University of Illinois, can shed some light on how Magnus Force can affect a baseball’s outcome. The study concluded that the spin of the ball can greatly affect its distance and speed. When talking about the baseball’s spin, Magnus Force is a key component to how a ball travels through the air. To briefly explain, Magnus Force is the effect that is placed on the ball when it is either struck by a bat or released by a player’s hand. When the ball travels through the air it is constantly spinning. The ball can spin forward, backward, or on it’s side. Whatever side of the baseball is applying the spin, the ball will generally travel in that direction. For instance, when a right-handed pitcher throws a screwball, the ball should start in the middle of the plate and finish on the inside corner. The ball travels that direction because the pitcher applies spin from left to right. This is a simple example of how the Magnus Force effect works on the thrown ball. There have been many studies of the batted ball as well. It has been generally concluded that a bat ball with backside will travel between 7-10 feet further than a batted ball with topspin. Also, with equal force applied to each ball, the study by University of Illinois found that the a ball with backspin has nearly 5 times less drag than other pitches. With less drag placed on the baseball, it has a chance to accelerate to a higher speed.
Looking at the batted ball study’s conclusion, I began to wonder if this hypothesis could be applied to the thrown ball as well. If a batted ball with backspin travels further than a ball with other spins it must have more velocity. If the same principles apply to throwing, could it be concluded that if more backspin is applied to a thrown ball it will improve its velocity upon release? Though, this hypothesis would go into direct disagreement with some pitchers assessment of speed. I remember reading about the pitch that “Rocket” Roger Clemens hit 100 MPH. He mentioned in the story that the ball short hopped the catcher. He said that when a teammate in the dugout told him of the reading he was surprised. With the pitch being low, Clemens had to release the pitch late, making him closer to the plate. The Magnus Effect, with Clemens 100 MPH pitch, might be a littler harder to prove.
If pitchers are going to us the Magnus Force effectively through the application of backspin, they must have strong and properly trained wrist and fingers. The following are three easy exercises pitchers can do to enhance their wrist and finger strength.
1. Basketball Rotations: In a standing position, pitchers will raise their throwing hand with a basketball in it. The pitcher place backspin on the basketball and try and elevate it as high as possible. When trying to elevate the ball, the pitcher should try and snap the wrist straight down. The pitcher should concentrate on the speed of the spin and try to speed up each rotation.
2. Shot Put Rotations: Using 4 lbs. shot put, the pitcher should hold it with their throwing hand and raise it straight up. With the throwing arm extended, the pitcher should try to elevate the shot put just like the basketball. The pitcher’s wrist and fingers should spin the shot put as many times as possible. Using resistance on the wrist and fingers should help pitchers increase the backspin on regular baseballs, which are much, much lighter.
3. Sand Bucket Grips: The pitcher should place their pitching hand in a bucket on fine-grained sand. With the pitcher’s hand covered, they should try and make a fist. Using the sand as resistance to the fingers, the pitcher should feel tension against the index, middle, and ring finger when doing this drill.
Monday, December 19, 2005
Team Offense and Defense
Handling Off-Speed Pitches
Objective:
In a game –like environment pitchers will practice throwing their best breaking balls for strikes, while hitters will practice hitting the pitcher’s off speed pitches in a straight line.
Procedure:
The coach will select 2-4 pitchers to participate in this team offensive and defensive drill. A regular infield will take the field and the coach should pre-select the order in which each position player bats. The drill should be split up into three different phases. The first phase of the drill is the “Change Up” phase. During this phase, the pitcher will throw a maximum of four pitches to the hitter. Only one of those four pitches can be a fastball. The rest of the pitches must be change ups. The catcher will be in charge of calling each at-bat and keeping the hitter honest with the fastball. The second phase of the drill is called the “Curveball” phase. Again, the hitter will receive four pitches during the at-bat. The pitcher is only granted one fastball to keep the hitter honest. The catcher will call the pitch sequence. The last phase of the drill is called “Third Pitch”. During this phase, the pitcher will throw a four-pitch at-bat to the hitter, while practicing their third off-speed pitch. The pitcher will again be granted one fastball per at-bat to keep the batter guessing when the breaking ball will be thrown. The catcher will continue to call the pitch sequence. The pitcher should be working on throwing their off-speed pitches for strikes. On the other hand, hitter should be focused on their balance and hand placement. Hitters should concentrate on keeping their hands back and not letting them drift forward even though their weight has shifted to the front half.
Summary:
This drill really helps pitchers throw their off-speed pitches in the game. Many times, a young pitcher who lacks confidence in his off-speed stuff will throw their breaking balls at a slower arm speed. When speed is taken off the pitcher’s arm, their ball does not get a lot of action. Furthermore, pitchers often have a hard time even getting the pitch over the plate. This drill allows the pitcher to let loose and practice throwing their breaking ball without worrying about making a mistake. After pitchers develop a rhythm of getting their breaking ball over the plate, they can advance to locating the breaking ball in different spots trying to get hitters out. Hitters also benefit from this drill. Usually in batting practice the off-speed pitches do not have a hard bite to their break, while this drill forces pitchers to apply a lot of force to their breaking balls giving hitters a game-like look at off-speed pitches. Hitters will not only increase their exposure to breaking balls, but work on maintaining proper balance throughout the swing. Also, the hitter should concentrate on keeping their hands back after loading and striding toward the pitcher. By practicing both of these skills, hitters should gain confidence toward hitting a change up, curveball, and any other off-speed pitch a pitcher can throw.
Friday, December 16, 2005
Linear Hitting on your Own!

Self Toss: A Way to Measure Success
Objective: To improve linear hitting, players will use their momentum while improving eye hand coordination through self toss.
Procedure:
The hitter will possess a ball in their top hand. With their lead arm, the hitter will hold the bat handle and rest the bat’s barrel against their shoulder. The hitter will take two hard shuffle steps towards the net or screen they are hitting into. On the second shuffle step, the hitter will flip the ball out in front of them with their top hand. After the flip, the hitter will grab the bat with the top hand and carry out the swing, helping the lead arm that was already on the bat. During the swing, the hitter will try to get their back leg off the ground and rotated behind their lead leg. To get these results, the hitter must try and generate strong straight line momentum with their two hard shuffle steps. The hitter should be encouraged to forcefully push with their rear leg during the shuffle. Also, on the flip, the hitter must toss the ball out in front of their body. When the ball is flipped in front of the body, the hitter can practice using momentum to fire through the pitch. If the flip is not out front, the hitter cannot use the force generated by the two shuffle steps.
Summary:
This really has been challenging for our young hitters. The drill really makes the hitter concentrate on staying focused on the ball. The hitter must stay down on the flip and accelerated through contact. The hitter should try and pull their back foot off the ground through rear leg generated momentum. Sometimes, this goes against the hitter's old teachings of keeping their weight back. In this drill, the hitter should forcefully drive their weight forward, while keeping their hands back to get lead arm extension. Furthermore, the beauty of this drill is that hitters can perform it without the use of a partner. After completing the drill, the hitter should stop on their follow through and check to see if all their weight has shifted from the back to a firm front side.
Wednesday, December 14, 2005
Improving Catchers Performance

Controlling the Running Game
Objective: To challenge catchers to react to base stealers that are practicing stolen base attempts during simulated at-bats to different bases.
Players in the Field:
A regular infield should take their positions with two catchers working behind the plate.
Players running the Bases:
Outfielders and pitchers should act like baserunners during this drill.
Procedure:
A regular infield should take the field with two catchers working behind the plate. Two pitchers, each possessing a ball, should take the mound as well. Outfielders and pitchers, working as baserunners, should be stationed at first and second base. One extra group will be first base also. One pitcher will be on the mound, while the second pitcher will be to the side, ready to take the mound after the other pitcher delivers to the plate. At each base, the runners will take their leads, while the pitcher comes into the set position. The runners on the pitcher will practice stealing second and third base. Furthermore, on the pitch, the extra group of baserunners at first base will practice their secondary lead, which should be three hard shuffle steps. While the players are stealing or getting their secondary leads, the coach will verbally communicate which base the catcher will throw the ball. The baserunners will practice all elements of the steal like the lead, jump, and slide. The other infielders will react to the baserunner in traditional fashion, covering the base they are responsible. After the catcher has thrown, they will quickly rotate with the next catcher behind the plate. The pitchers also will switch out with one another quickly. Pitchers always need to possess a ball during these drills, so the drill can be performed quickly.
Summary:
This drill can be adapted to fit any coach’s baserunning or defensive scheme objectives. The baserunners have a lot of variations at their bases including delayed steals or first move steals on left handed pitchers. Also, secondary leads on second base can be practiced by runners as well. Defensively, this drill can help catchers improve their reaction to pitched balls with runners on base. By waiting for the coach’s command catchers will get a game-like situation where they must respond with quickness and efficiency. Furthermore, infielders will improve their knowledge of responsibilities associated with covering the base on steal attempts. Also, they can work on tag quickness and stability. Finally, coaches can even incorporate pitch counts to the drill forcing the pitcher to throw one or two strikes before the runners attempt to steal. Even breaking ball strikes can be included to enhance the drill.
Saturday, December 10, 2005
The Unknown Muscle

Why is Pronation Important?
To the right, I have posted a picture on the forearm. In this picture, highlighted in red, is the pronator teres muscle. This muscle controls the pronation of the pitcher’s hand just before the ball release. As you can see, the muscle starts under the elbow and wraps around to top of the forearm connecting to the wrist. If you want to find the muscle, place your left hand where your right elbow and forearm meet. Then, extend your right wrist up and down. You should feel a muscle contract under the forearm, enxt to the elbow. This muscle is the pronator teres. For anyone who does not think they pronate before release, here is some interesting proof. In the August 2005 edition of Strength and Conditioning Journal, Jeff Jeran and Robert Chetlin state that pronation of the forearm occur 10 milliseconds before release. These two men have written a highly informational article on pitcher’s arm strengthening and stabilizing. This is not the first time information on pronate has been published. Will Carroll, in his book Saving the Pitcher, documented that pitchers pronate their forearm just before release. He even offers a picture of Mark Prior pronating his hand while releasing the baseball during practice. Their theories of pronation would only strengthen Dr. Marshall’s idea of training pitchers to strongly pronate their throwing arm to increase pitching velocity. Below, I am listed some exercises that our pitchers will incorporating this season to improve pronator strength:
1. Wrist Contractions: The pitcher, with 2-3 lbs. dumbbells, will be in a seated position. The pitcher will rest his pitching forearm on his quadriceps. The players hand should be extended past the knee so his hand can move freely up and down. Only his forearm should be supported by the quadriceps. With his throwing arm’s forearm supported and wrist in a neutral position, the pitcher will lower the dumbbell to full wrist extension. At full extension, the pitcher should feel his forearm muscle contract. The pitcher will hold for two second, and then raise the wrist back to the neutral position. The pitcher will perform three sets of 20.
2. Thumb Turns: The pitcher, with 2-3 lbs. dumbbells, will be in a seated position. The pitcher will rest his pitching forearm on his quadriceps. The players hand should be extended past the knee so his hand can move freely up and down. Only his forearm should be supported by the quadriceps. With his throwing arm’s forearm supported and wrist in a neutral position, the pitcher will turn their thumb down like twisting a door knob open, finshing with his pinky finger facing up. The pitcher should feel his forearm muscle contract. The pitcher will hold for two second, and then turn the wrist back to the neutral or handshake position. The pitcher will perform three sets of 20.
3. Weighted Ball Pronations: The pitcher, with a 7-ounce ball, will be down on their throwing arm knee. The pitcher will place his throwing elbow in this glove to support the throwing arm’s weight and target the hand movement during release. The player’s wrist should start in a neutral position and bring the ball back to a cocked position. Then, the pitcher should “flick” the ball to his throwing partner. During this phase, the pitcher will pronate the hand during the “flick” so the pinky finger is pointing up after release. The pitcher will perform three sets of 20.
4. Tennis Ball Squeezes: Seated on a bench or chair, the pitcher will let their arms dangle at their sides. In each hand, the pitcher will have a standard tennis ball. For one minute intervals, the pitcher will squeeze the tennis balls as many times as time allows. The pitcher should keep arms at their sides to increase and stimulate blood supply to the muscle. Pitchers will do three sets at one minute each.
5. Shot Put Turns: The pitcher will standard in the standard shot put position. Their elbow should be up and parallel or above the shoulder. The shot put, weighing approximately 12 lbs, will rest to against the pitcher’s trapeziums muscle located close to the neck. The pitcher, not dropping the elbow, will raise the shot put by extending the arm. While extension occurs, the pitcher will rotate their thumb in a counter clockwise position. Once extension has occurred, the pitcher will rotate thumb back to neutral and lower the shot back to the original position. The pitcher should place special emphasis on never dropping the elbow lower than shoulder level. For pitchers who are inexperienced at using the shot put, coaches should hold their elbow during the exercises. Pitchers will do three sets of 10.
Wednesday, December 07, 2005
Working the Lower Half

Training the Groin
I have posted a picture on the left to illustrate how important the groin area is for pitchers. As you can see, Pedro Martinez’s groin is almost completely stretched to the limit as he pushes off the rubber and plants the lead leg. Now, after lead leg plant has been achieved, Pedro will have to flex the groin and push with the glove leg. This action must happen instantly and with great thrust. To complete this task the groin must be properly exercised and trained. With a strong and durable groin, pitchers can achieve greater throwing velocity by increasing the “coupling” force of the lead leg to the plate. At Omaha Central High School, our pitchers perform the following exercises to improve groin strength and durability.
Activities:
1. Splits Stretch: The pitcher will split legs as far as the groin will allow holding the stretch for approximately 10 seconds. The pitcher will perform 3-5 sets with the goal of trying to get closer to the floor every time.
2. Lunge for Length: The pitcher will place hands on head and perform a walking lunge. The pitcher will extend as far as possible, stopping for the trail knee to touch the floor. The pitcher will perform 3-5 sets of lunges for 20 yards.
3. Lunge with Weight: The pitcher, depending on his strength, will place 30-45 lbs. dumbbells in their hands. With the dumbbells at their side, the pitcher will perform a walking lunge. The pitcher will extend as far as possible, stopping for the trail knee to touch the floor. The pitcher will perform 3-5 sets of lunges for 20 yards.
4. Uphill Lunge: The pitcher will place their hands on head and face stairs. Taking 3-4 stairs at a time, the pitcher will walk slowly up the staircase. At Central, our pitchers walk up three flights. The pitcher should perform task slowly and feel the groin flex during each lunge. After the movements has been mastered, the pitcher can increased speed and move quickly up the stairs. Our pitchers perform these exercises for 10 minutes.
5. Uphill Lunge with Weight: The pitcher, holding 30-45 lbs. dumbbells at their side, should face the stairs. Taking 3-4 stairs at a time, the pitcher will walk slowly up the staircase. At Central, our pitchers walk up three flights. The pitcher should perform task slowly and feel the groin flex during each lunge. The dumbbell weight should add extra resistance to the exercise. Our pitchers perform these exercises for 10 minutes.
Monday, December 05, 2005
The "New" Pitch
Looking for the Gyro!
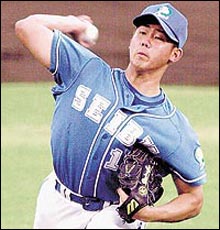
Attention all pitching coaches, I need your help. If there is a coach out there that has any information on the gyroball, please post some details on this website. The gyroball is an exciting pitch from Japan that has stimulated my interest. I have found some information on the gyroball, but I am seeking to understand all elements on the pitch. Apparently, the pitch is quite successful in Japan.
To the left of this page, I have posted a picture of Daisuke Matsuzaka. He is a pitcher for Japan’s Seibu Lions. It is said that he has a wonderful “gyroball” that compliments his 98 MPH fastball well. The gyroball appears to have breaking ball characteristics, but breaks hard away from hitters. The pitch, when working, is not only hard to read out of a pitchers hand, but the hard break makes the pitch virtually unhittable.
If there is any coach with drills, grips, explanations, or videos of the pitch, please contact this website and share your knowledge. I believe this pitch can help high school pitchers dominate the opposition.
Thursday, December 01, 2005
Checking the Straight Line
Objective:
The hitter will check their bat path by redirecting the ball in a straight line flipped by the coach from directly behind or to the side of the player.
Procedure:
The coach will set up a bucket of balls behind the plate. The hitter will take their offensive stance in the batter’s box. If indoors, the coach should place the plate directly on a straight line. Then, when taking a knee behind the hitter, the coach should kneel on the line as well. The line will serve as a guide for the soft toss flip. Also, the line will show the hitter exactly where the ball should be redirected. The coach should verbally cue the hitter through the oral commands of the swing: load, stretch, and fire. After the “stretch” command, the coach should flip the ball along the line, directly in front of the hitter. After the flip, the coach should shout the command of “fire”. The hitter should redirect the ball straight ahead with a proper linear swing. If this does not occur the hitter and coach must locate the problem. If the hitter is pulling the ball, the coach may look at top hand dominance. Is the hitter releasing with the top hand? This is a question the coach may pose to his hitter. Also, if the hitter is popping the ball up the other way, the coach may look at the back elbow positioning. Is the back elbow getting the hands to the “flat” position or is the elbow too high and not getting the hands to the ball in time for solid contact to be made? Another question the coach should pose to a young hitter.
Side toss is another way a hitting coach can check the hitter’s line. Again, the coach does not set up in the traditional soft toss position. The coach should set up directly to the side of the hitter. From this angle, the coach should have a “bird’s eye view” of the hitter’s weight shift and lead arm extension. Once more, the ball will be flipped and the coach will ask the hitter to direct the ball in a straight line. If this is not achieved, the hitter must focus on producing swings that produce line drives up the middle.
Baseball Screen or Net
___________________
H *
C
H = Hitter
* = Plate
C = Coach
![]()